Red Spider Mite Control: Managing Dry-Season Infestations
A technical manual for identifying, suppressing, and eliminating mites through humidity manipulation and biological intervention.
1. Introduction: The Invisible Extractor
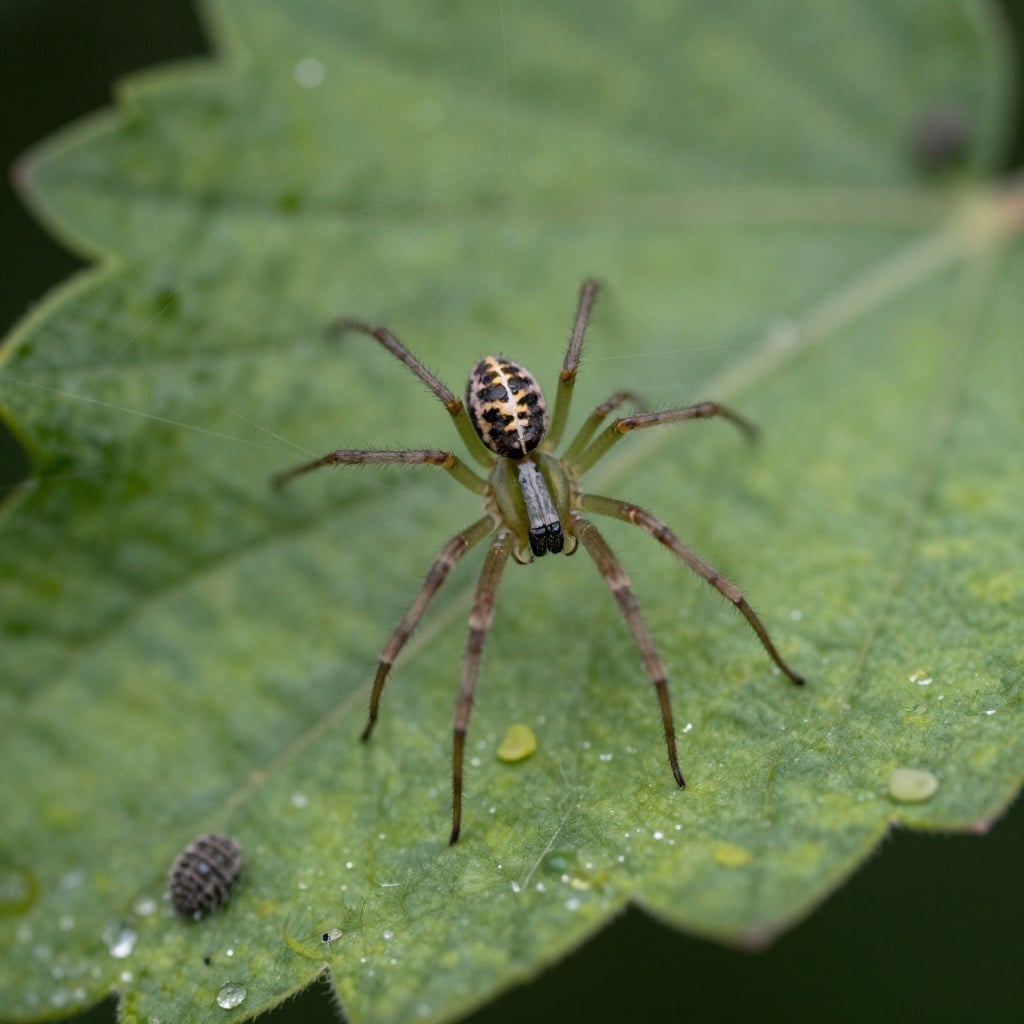
In the Evergreen Hideout, the Red Spider Mite is a particularly deceptive pest because it thrives in the exact conditions that characterize our Soshanguve winters: heat and low humidity. These microscopic arachnids do not chew leaves; instead, they use their needle-like mouthparts to pierce individual plant cells and suck out the chlorophyll. Because they are nearly invisible to the naked eye, many gardeners only realize they have a problem when they see tell-tale "stippling" (tiny yellow dots) on leaves or fine webbing that appears once an infestation has reached a critical mass. Left unchecked, a spider mite colony can defoliate a tomato or bean plant in days, making them a high-priority target for our technical defense protocols.
Early detection is non-negotiable. Learn to distinguish mite damage from other issues:
- Spider Mite Stippling: Hundreds of tiny, pale yellow or white dots clustered on the upper leaf surface. The leaf takes on a dusty, bleached appearance. Test: Hold a white piece of paper under a suspect leaf and tap the foliage. If tiny, moving specks (smaller than a pinhead) fall and start crawling, you have mites.
- Thrips Damage: Similar stippling but often has a silvery sheen and black fecal specks.
- Nutrient Deficiency: Yellowing is more uniform or follows leaf veins, not random speckling.
High-Risk Zones: Check plants under eaves, against sunny walls, in poly-tunnels, and the leeward (sheltered) side of taller plants first. These are "dry-air pockets."
Biological Mechanics: Mites thrive in dusty, dry environments where their predators cannot survive.
The key to managing spider mites is understanding their environmental preference. They are "arid-zone" specialists that reproduce exponentially when the relative humidity drops below 50 percent. This is why they often strike plants that are sheltered under eaves or inside greenhouses where the air is stagnant. By recognizing that mites are an environmental symptom as much as a biological pest, we can use "Soil Armor" techniques found in our guide on using grass mulch to create a more humid microclimate at the leaf surface. This simple shift in moisture management is often enough to stall a mite population before it becomes a disaster.
Your goal is to maintain a leaf-level humidity above 60%. This slows mite reproduction dramatically without promoting foliar fungal diseases. Here's how to engineer it on the Highveld:
- Strategic Mulching: A 7-10cm layer of fine grass clippings or straw directly around the stem base. As it decomposes, it releases moisture vapor, raising humidity in the critical lower canopy.
- Companion Planting for Humidity: Interplant tall, dense crops (like maize) on the western side to create afternoon shade and reduce wind, which dries leaves. Low-growing, dense plants like basil or oregano at the base act as living mulch.
- Avoid Dust: Keep garden paths watered down or planted. Dust on leaves is a sign of dry air and provides perfect hiding spots for mites.
2. Why This Topic Matters: The Rapid Life Cycle
The primary reason Red Spider Mites are so destructive is their blistering reproductive rate. In the heat of a Gauteng afternoon, a mite can go from egg to egg-laying adult in as little as five to seven days. This means that if you miss even a small colony during your weekly scouting, you could be facing thousands of mites by your next visit. This exponential growth is why mite management is a critical chapter in our the organic pest master manual. We cannot rely on a single treatment; we must use a technical "stack" of interventions to break the overlapping generations of eggs, nymphs, and adults.
To defeat an exponential threat, your intervention must be faster than their reproduction. This demands a scheduled, multi-pronged attack.
- Day 0 (Detection): Execute a high-pressure water spray (see protocol below).
- Day 3: Apply a suffocating treatment (horticultural oil or soap) to kill newly hatched nymphs that survived the spray.
- Day 6: Repeat the high-pressure water spray to disrupt any new webbing and dislodge maturing mites.
- Day 9: Apply a second suffocating treatment. This 9-day, four-action stack covers two full life cycles, ensuring no stage is missed.
Furthermore, spider mites are notorious for developing resistance to synthetic chemical miticides within just a few seasons. For the organic gardener at the Hideout, this is actually an advantage, as our biological methods—like using microbial stimulants from your DIY worm farm—work by improving the plant's own systemic defenses rather than relying on a single toxic pathway. A plant with high sap pressure and robust cell walls is a much more difficult target for a mite than one that is stressed and dehydrated. By focusing on the biological health of the host, we make our garden a hostile environment for these tiny extractors.
Mites are weak extractors. They prefer plants under drought or nutrient stress, where cell sap is more concentrated and easier to suck. Your worm farm is a key weapon here.
- Worm Tea Application: A weekly foliar spray of diluted worm castings tea (1:10 ratio) coats leaves in beneficial microbes. These microbes can outcompete mites for space and may induce the plant's Systemic Acquired Resistance (SAR).
- Consistent Deep Watering: Use the trench method or deep watering to maintain even soil moisture. This ensures high turgor pressure (sap pressure) within leaf cells, making them physically harder for mites to pierce.
- Silica Supplementation: Adding a silica source (like rice hull ash or potassium silicate) to your soil or as a foliar spray strengthens plant cell walls, creating a tougher "skin" that deters feeding.
3. The Technical Shield: Water as a Miticide
The most effective and immediate technical intervention against spider mites is surprisingly simple: high-pressure water. Mites detest moisture and are easily dislodged from the undersides of leaves. By using a "fine but firm" spray of water directed at the bottom of the foliage during the early morning, you physically remove the adults and destroy their delicate webbing. This webbing is not just for protection; it acts as a "highway" that allows mites to move rapidly across the plant and even "balloon" on the wind to neighboring beds. Disrupting this infrastructure is the first step in any successful eradication program.
This is a technical procedure, not casual watering. Incorrect pressure can damage plants or be ineffective.
- Equipment: Use a spray nozzle with a "flat" or "fan" setting that produces a firm, wide spray, not a jet stream. A pump-action pressure sprayer works best.
- Pressure Test: The spray should be firm enough to make the leaves dance and flip over, revealing their undersides, but not so hard it tears or bruises the tissue.
- Technique: Start from the bottom of the plant, aiming upwards at a 45-degree angle. Systematically work up the plant, ensuring every leaf's underside is hit. The goal is to create a "storm" that washes mites off and shreds their webbing.
- Timing: Apply in the late morning after dew has dried, so leaves don't stay wet overnight (avoiding fungus). The sun will help dry the plant quickly.
- Frequency: In an active infestation, do this every 3 days as part of the breaking cycle protocol. For prevention in high-risk areas, once a week is sufficient.
Mechanical Removal: Water is your most powerful organic tool when directed at the undersides of leaves.
To make this water treatment even more effective, we recommend increasing the ambient humidity around your most sensitive crops. This can be achieved by lightly misting the "Soil Armor" or grass mulch around the base of the plants during the hottest part of the day. As the water evaporates from the mulch, it creates a humid "envelope" around the leaves that slows down mite reproduction and encourages their natural predators, like predatory mites and ladybugs, to move in. This is a key component of climate-control strategies where we design our garden layouts to minimize dry-air pockets and encourage natural moisture retention.
For severe or recurring infestations, especially in greenhouses, you can recruit the ultimate specialist: Phytoseiulus persimilis, a predatory mite that feeds exclusively on spider mites.
- How to Use: Order online from a biological control supplier. Release the sachets or bottles directly onto infested plants when you first see mite stippling.
- Conditions for Success: Predatory mites require humidity >60% and temperatures between 20-30°C. They will die out once they've eaten all the pest mites, making them a self-limiting, perfectly targeted solution.
- Hideout Compatibility: Do not use horticultural oils or soaps for at least a week before and after releasing predatory mites, as these will kill them.
4. Biological Oils and Mineral Applications
When environmental manipulation is not enough to stop an outbreak, we turn to horticultural oils and potassium-based soaps. These treatments work by "smothering" mites and their eggs, physically blocking their breathing pores. Because these oils have no residual toxicity, they must be applied with technical precision to ensure every mite is coated. We often combine these oils with a light application of minerals found in agricultural lime and wood ash. While ash is primarily for soil health, a very fine dusting on the stems can act as an abrasive barrier that makes it difficult for nymphs to travel between leaves.
Choosing and applying the right suffocating agent is critical for efficacy and plant safety.
- Horticultural Oil (e.g., Canola, Neem): Smothers all stages. Mix 10ml oil + 2ml soap per litre of water. Test on a leaf first. Apply in the cool evening to prevent phototoxicity. Do not use when temperatures exceed 32°C.
- Insecticidal Soap (Potassium Salts): Effective on soft-bodied nymphs and adults, less so on eggs. Mix as per label (typically 15-20ml per litre). Must contact the pest directly. Reapply every 4-7 days.
- Application Rule: Thoroughness over volume. Use a fine mist sprayer to coat the undersides of every leaf until glistening. The lower leaf surface is non-negotiable.
- The Ash Barrier: Sift wood ash to a fine powder. On a still morning, lightly dust lower stems and the undersides of a few key leaves. Reapply after rain or watering. This is a physical deterrent, not a kill mechanism.
It is vital to remember that spider mites often hide in the cracks of garden stakes, trellis wires, and even the dry edges of your mulch. When treating an infested plant, you must also treat the surrounding infrastructure to ensure no "refuge" populations remain. After the season ends, any heavily infested plant material should be removed and processed through a high-heat system like the 18-day hot compost method. The thermophilic temperatures in a properly managed compost pile are sufficient to kill both adults and eggs, ensuring that you don't re-infest your beds when you apply your next round of organic fertilizer.
Preventing overwintering is how you win next year's war. Mites can survive on dead plant matter and structures.
- Remove and Destroy: Pull all annual plants with any history of mites. Do not cold-compost. Burn or bag for municipal disposal if you lack a verified hot compost system.
- Sanitize Infrastructure: Scrub tomato stakes, trellis wires, and greenhouse frames with a 10% vinegar solution or a mild bleach solution (1 part bleach to 9 parts water). Rinse thoroughly.
- Soil Surface Treatment: Lightly water the bare bed, then cover with clear plastic (solarization) for 2-3 weeks of hot weather, or apply a generous layer of compost and mulch heavily to encourage predatory soil mites that will consume any fallen eggs.
5. Summary and Your Next Move
Managing Red Spider Mites in Soshanguve is a matter of humidity, hygiene, and high-frequency observation. By understanding that these pests are driven by dry air, you can use simple water-based technical interventions to protect your high-value crops without ever needing a synthetic spray. It is a biological approach that prioritizes the stability of the ecosystem and the health of the plant over the convenience of a chemical fix. At the Evergreen Hideout, we don't let the dry winter air defeat us; we use it as a signal to tighten our moisture management and keep our soil and foliage vibrant and mite-free.
When you see stippling, follow this logical sequence to choose your response:
- Step 1: Assess Infestation Level
- Light (Few leaves, minor stippling, no webbing): Proceed to Step 2A.
- Heavy (Many leaves, visible webbing, leaf discoloration): Proceed to Step 2B.
- Step 2A: Light Infestation Response
- Implement the High-Pressure Water Spray Protocol every 3 days for two weeks.
- Increase local humidity via mulch misting.
- Apply a weekly worm tea foliar spray to boost plant defenses.
- Step 2B: Heavy Infestation Response
- Immediately begin the 9-Day "Breaking the Cycle" chemical-free stack (Water-Day3-Oil-Day6-Water-Day9).
- Consider introducing predatory mites (P. persimilis) if in an enclosed space.
- Prune and destroy the most heavily webbed leaves/branches.
- Step 3: Prevention for Next Cycle
- After control is achieved, switch to a weekly preventative water spray.
- Implement the End-of-Season Sanitation Drill.
- Plan next season's garden to include humidity-companion plants.
Have you noticed tiny yellow dots on your bean or tomato leaves lately? I want to know if you have tried the "water-spray" method for mites or if you are currently using a greenhouse where humidity is a challenge. Are you seeing silk webbing on your plants, or are you looking for more advice on identifying these microscopic pests before they spread? Share your mite-fighting stories and your questions in the comments below. Let us work together to make the Evergreen Hideout a resilient and pest-free haven for all our favorite crops!